

Spring Centrepiece With Naturally Dyed Eggs & Pussy Willow Nest

Nikki Wiart found her way back to her parent’s farm in 2017, (after working in journalism), to start Lady’s Hat Farm. Over the years, Wiart fell deeply in love with everything floral and everything fuzzy. She loves these things in a way that also regenerates the land, builds community and encourages other women to pursue a career in farming.
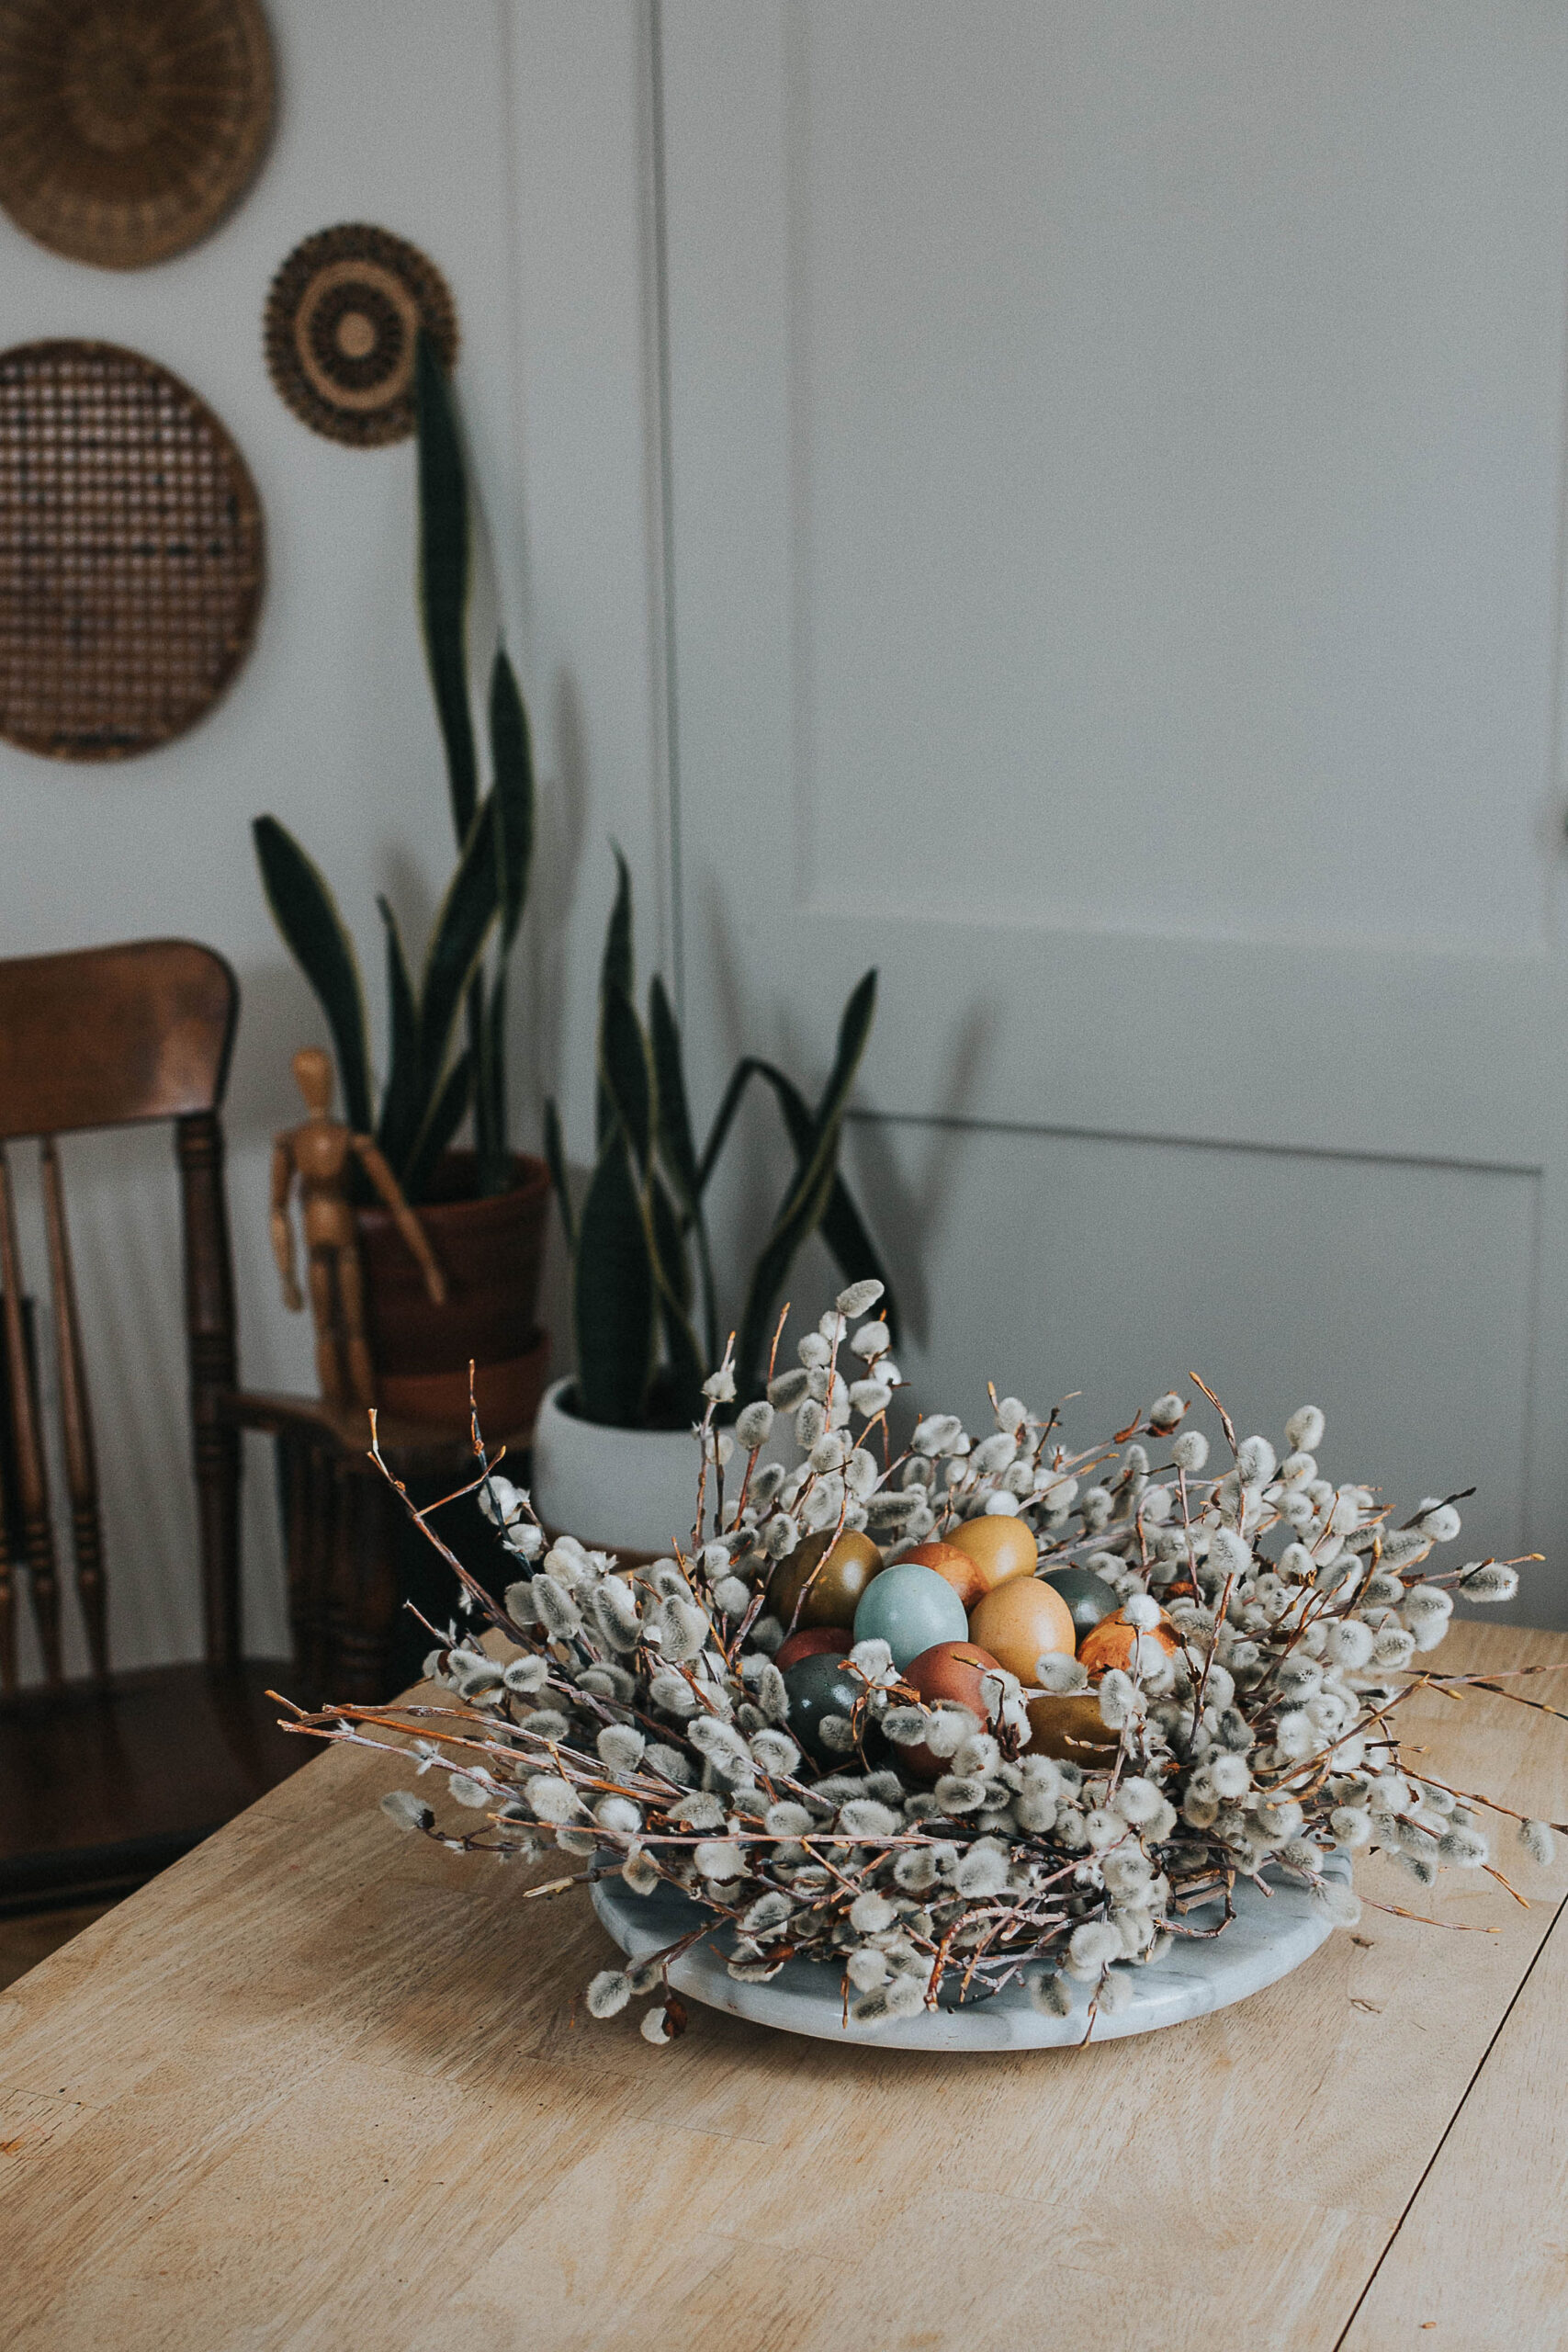
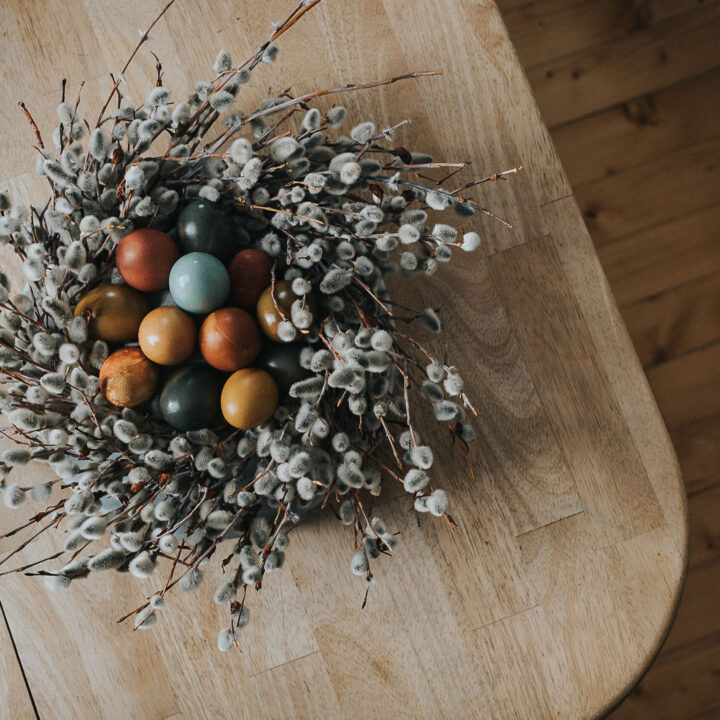
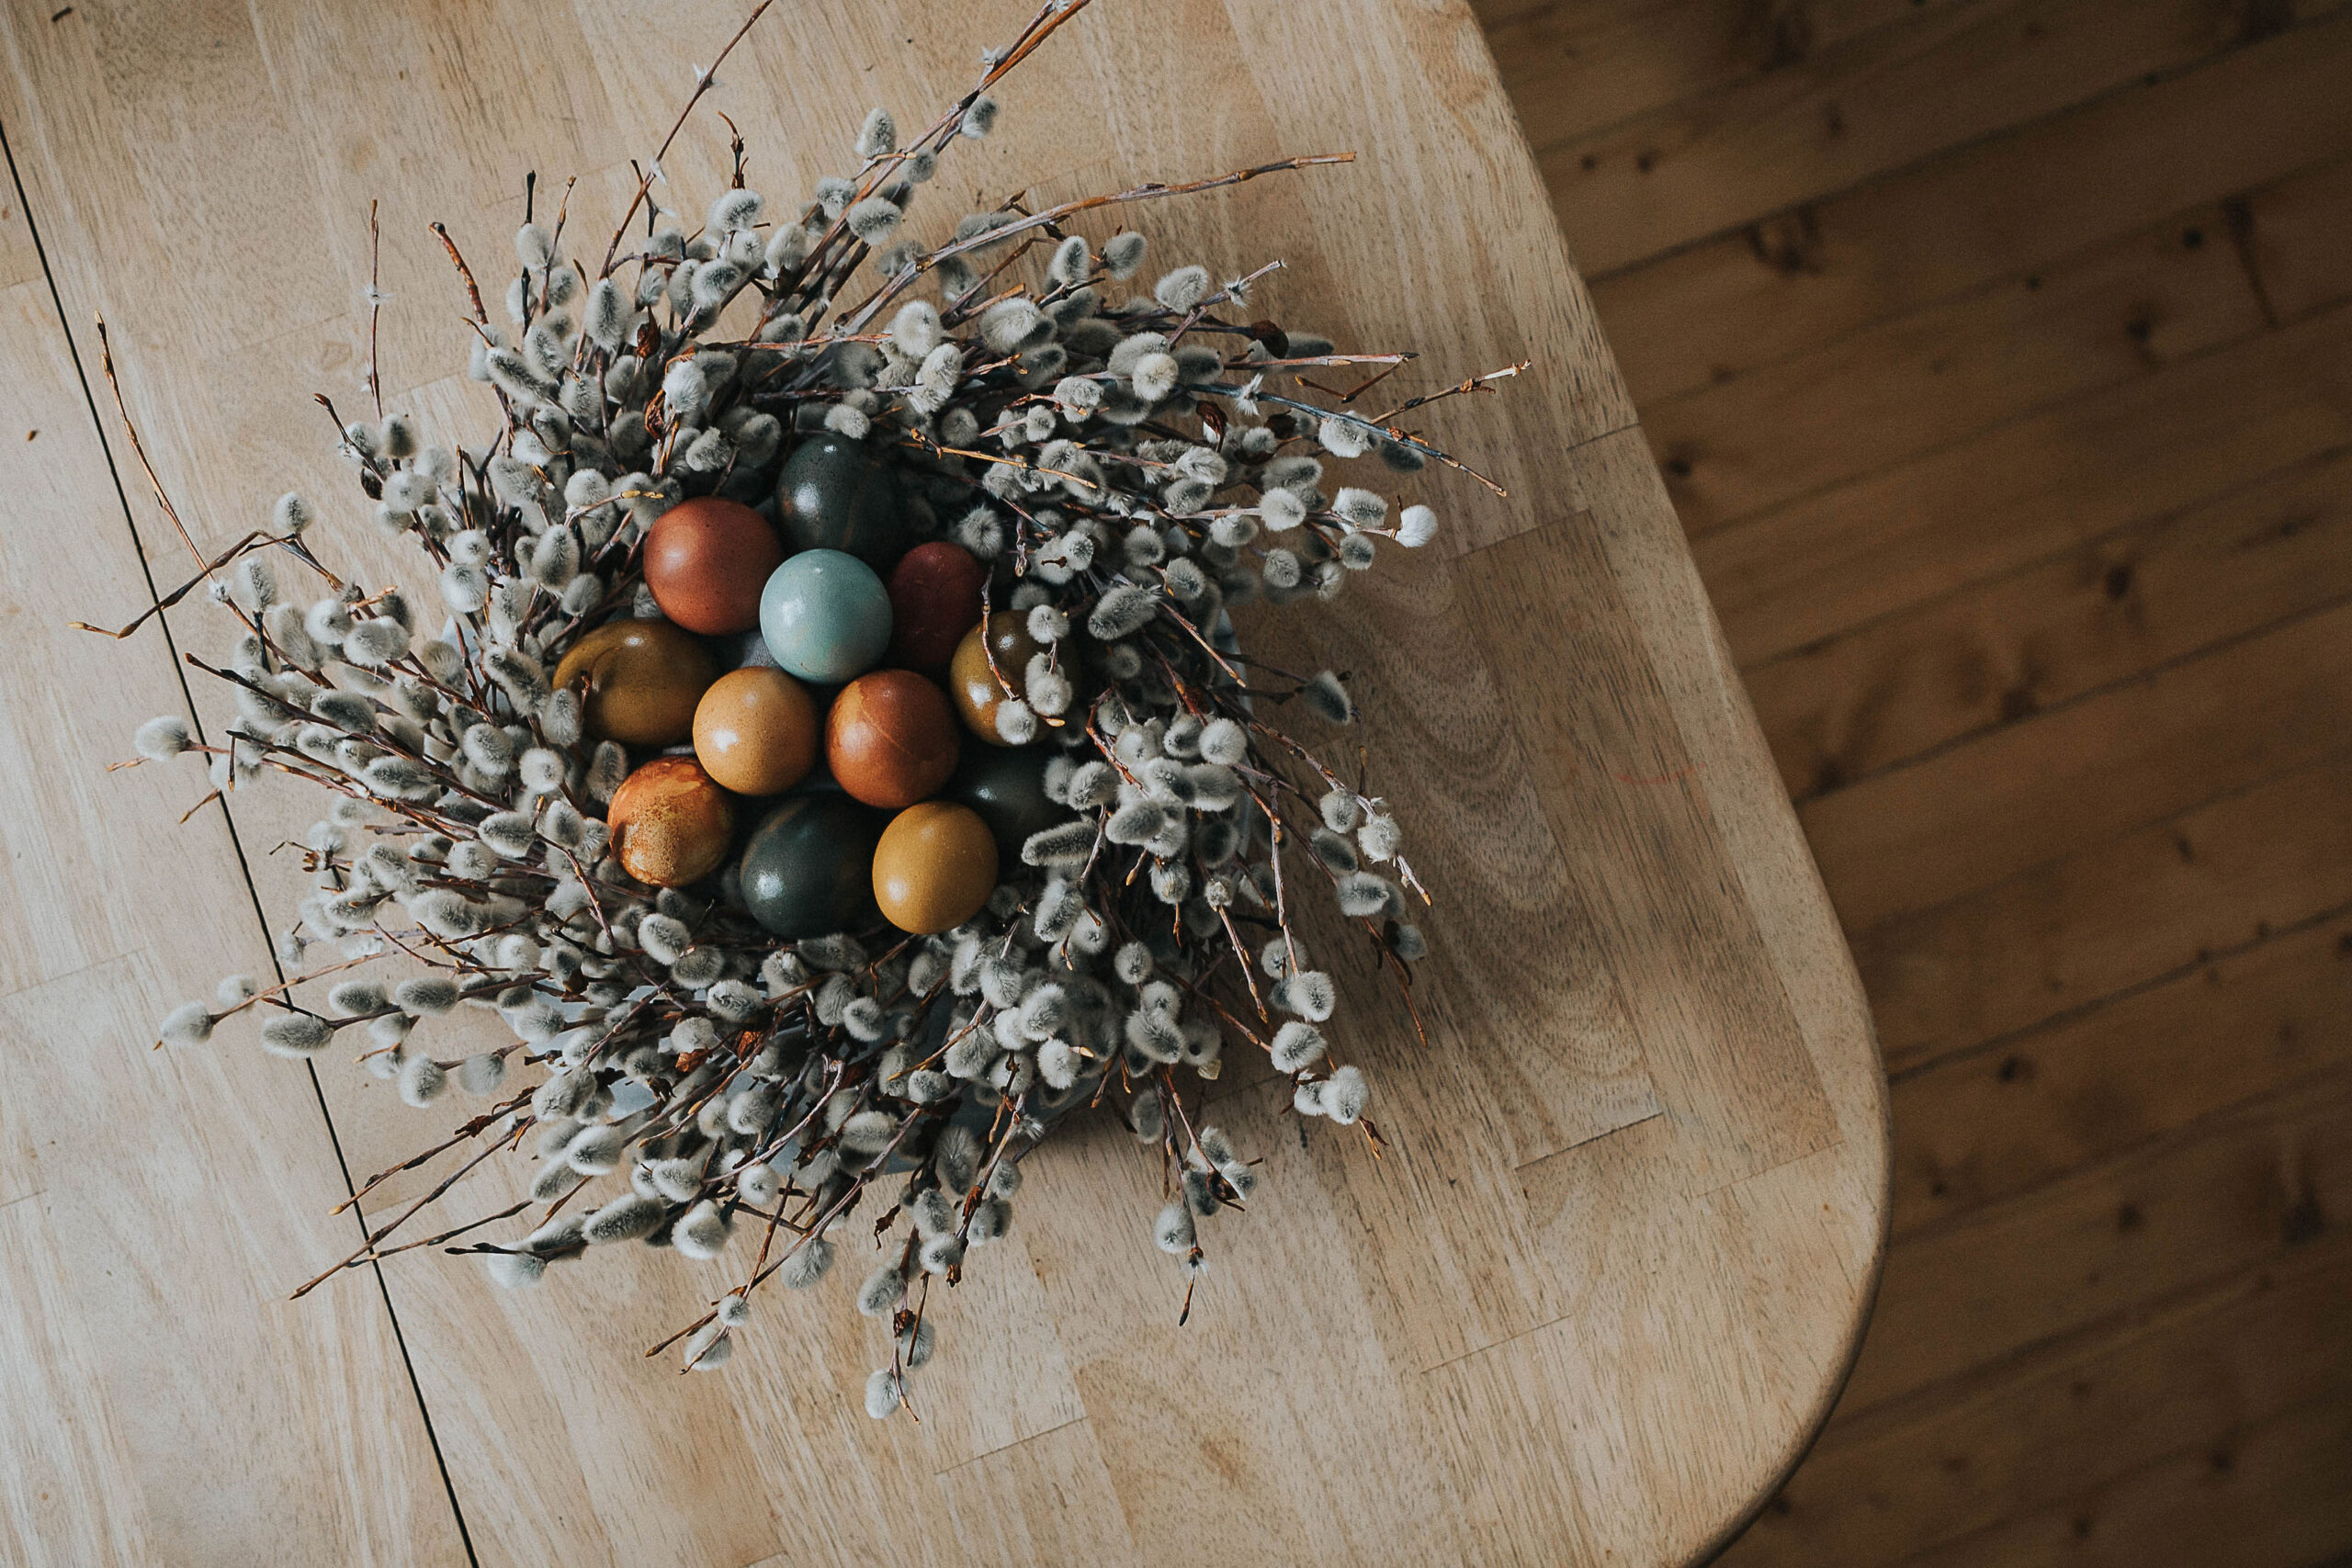
Learn how to make this spring centrepiece by Nikki Wiart, complete with foraged pussy willows and naturally dyed eggs, the perfect setting for an Easter gathering.
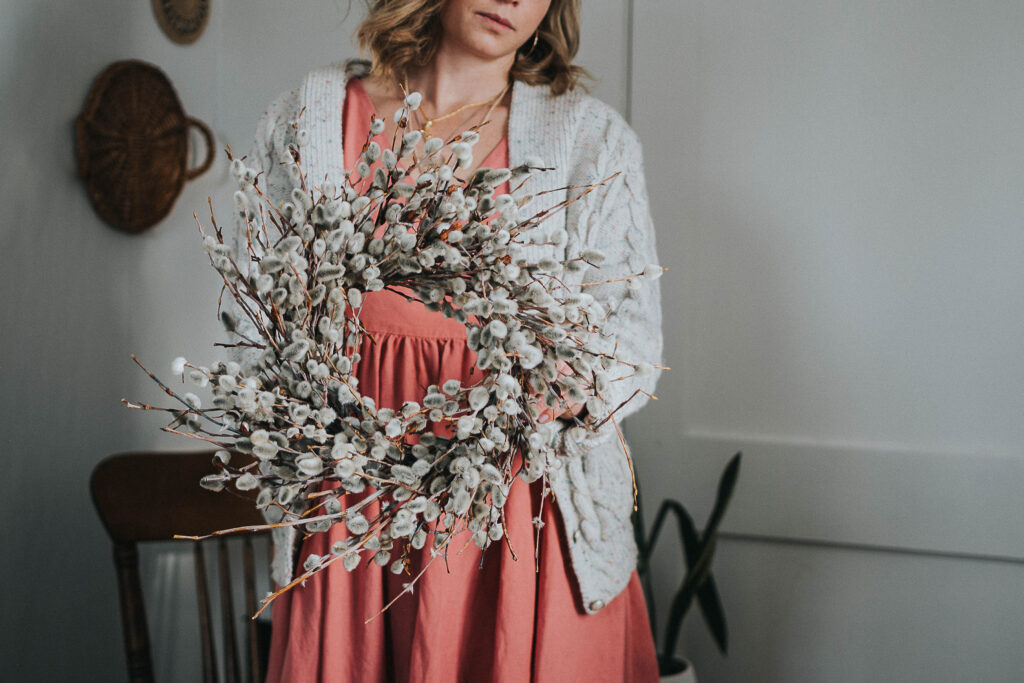
Ah, spring. Beautiful, wonderful spring. Pussy willows in bloom, to me anyways, have always been that sure sign that yes, after months of cold, harsh winter, spring is inevitably coming. Pussy Willow wreaths and nests have been a staple in my home for years now, and filling them with naturally dyed eggs instead of toxic, synthetically dyed eggs, is my new favourite Easter tradition. The best part? You can compost the eggs when you tire of them and hang your nest on the wall as a wreath! It’ll last for years.
What You Need to Naturally Dye Eggs
- Eggs (brown, white, green, blue – any colour works and will create a different shade!)
- Mordant (I use vinegar, but you can use Alum if you have it on hand)
- Red Cabbage (for blue and purple toned eggs)
- Red Beets (for red and pink toned eggs)
- Turmeric (for yellows, and to mix with the other colours for green and orange)

How To Naturally Dye Eggs
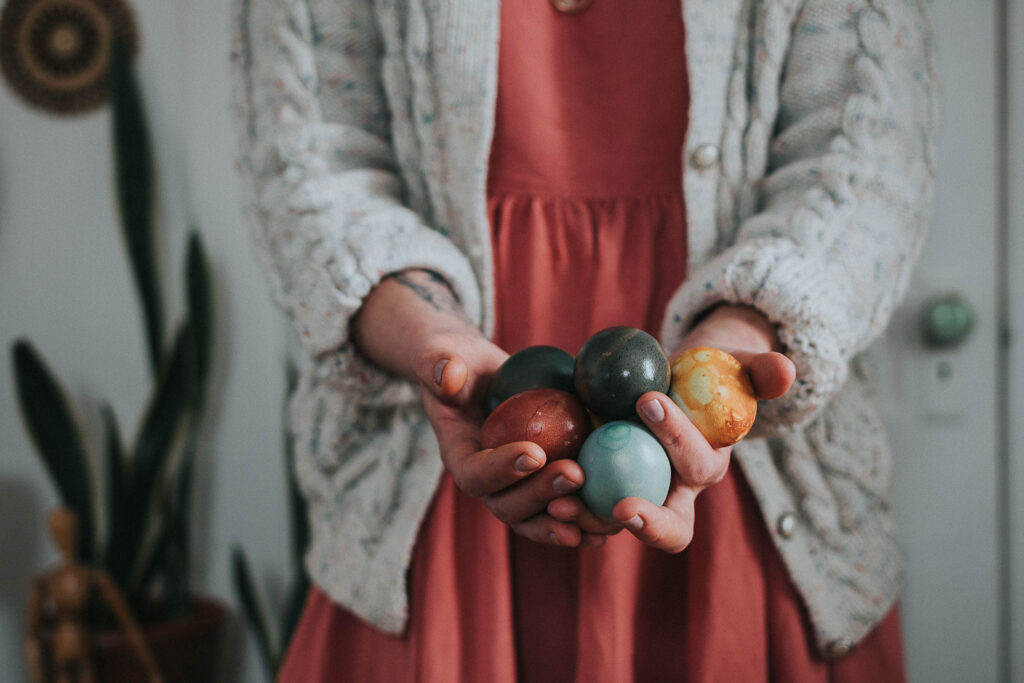
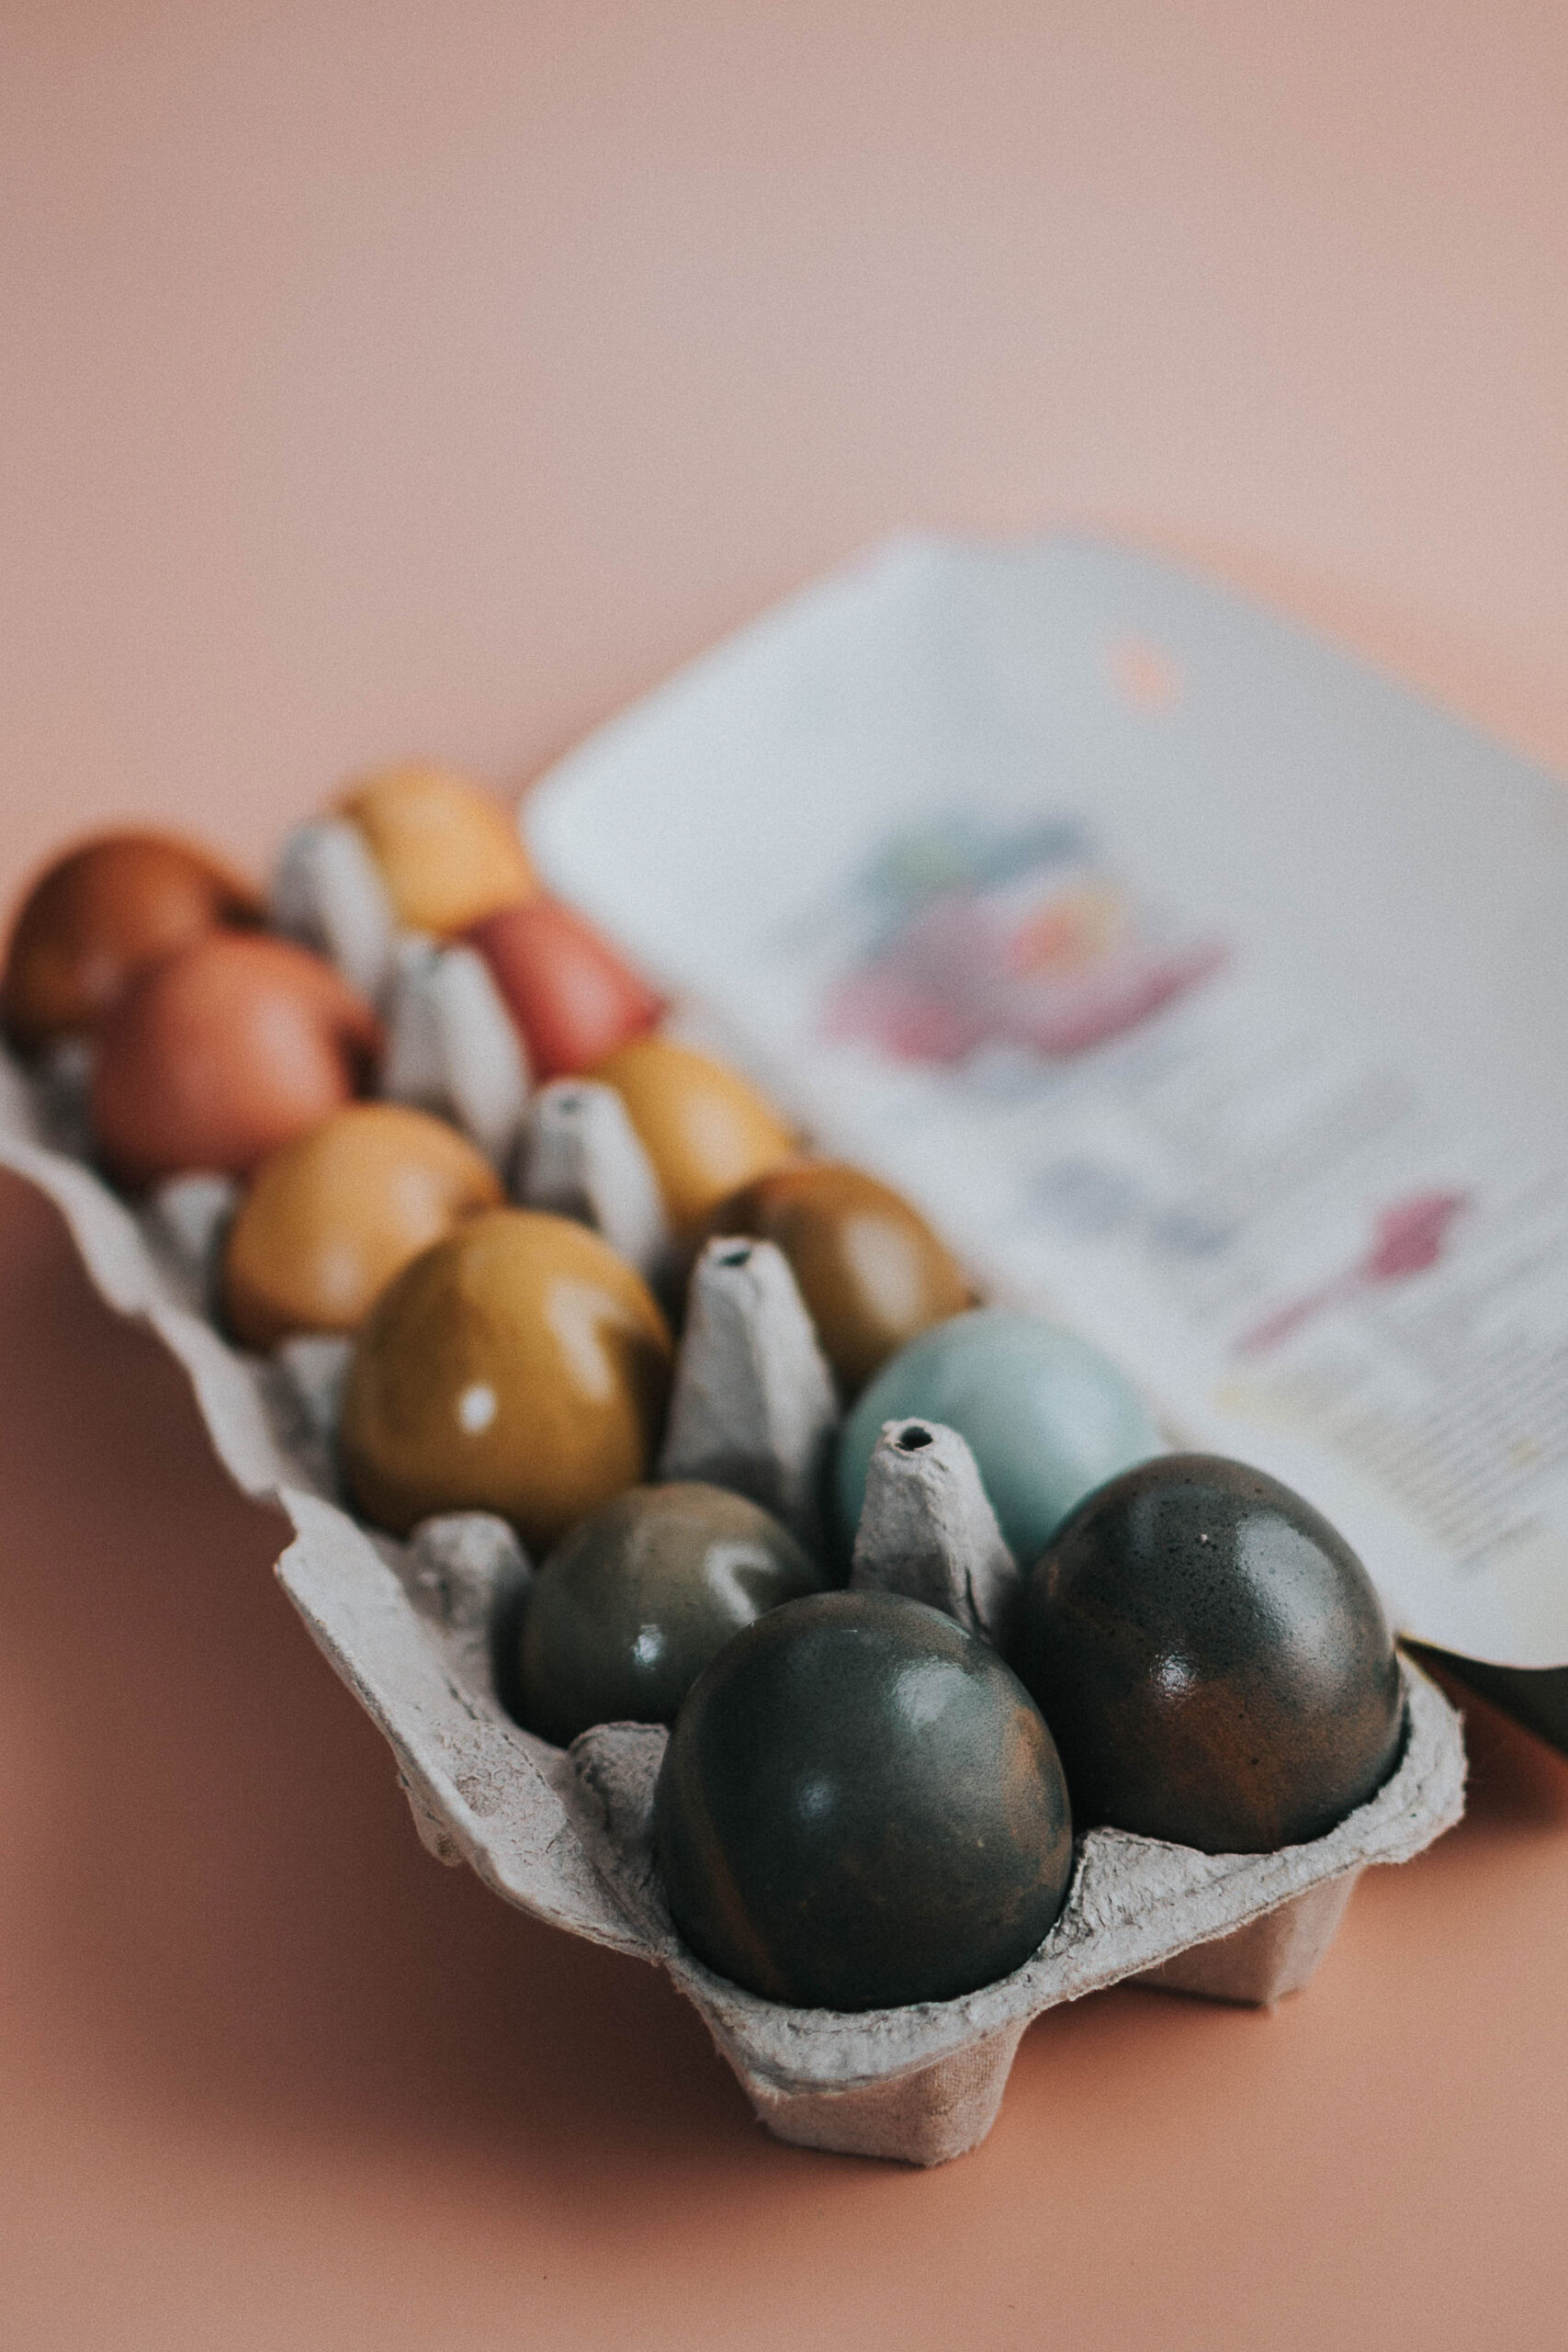
Boil your eggs: I like to place the eggs in the water before it begins to boil as there’s less risk of cracking them. Bring the water to a boil, and then allow to simmer for 12 minutes. Let eggs cool.
Make your dyes: For blue dyes, use red cabbage. Shred 1⁄4-1⁄2 of a cabbage (at least 2 cups), place in a pot and cover completely with water. Bring to a boil and let simmer for 15 minutes. Strain mixture into a glass pint jar and add in one tablespoon of vinegar. Allow to cool.
For red dyes, use the same process but use 2 cups of shredded red beets. For yellow dyes, use 2 tablespoons of turmeric and mix with warm water and one tablespoon of vinegar.
There’s no need to boil the water for the turmeric dye. I’ve experimented with other types of natural dyes before, but I’ve found I can get the same effect and colours by switching the eggs between the dyes and monitoring timing.
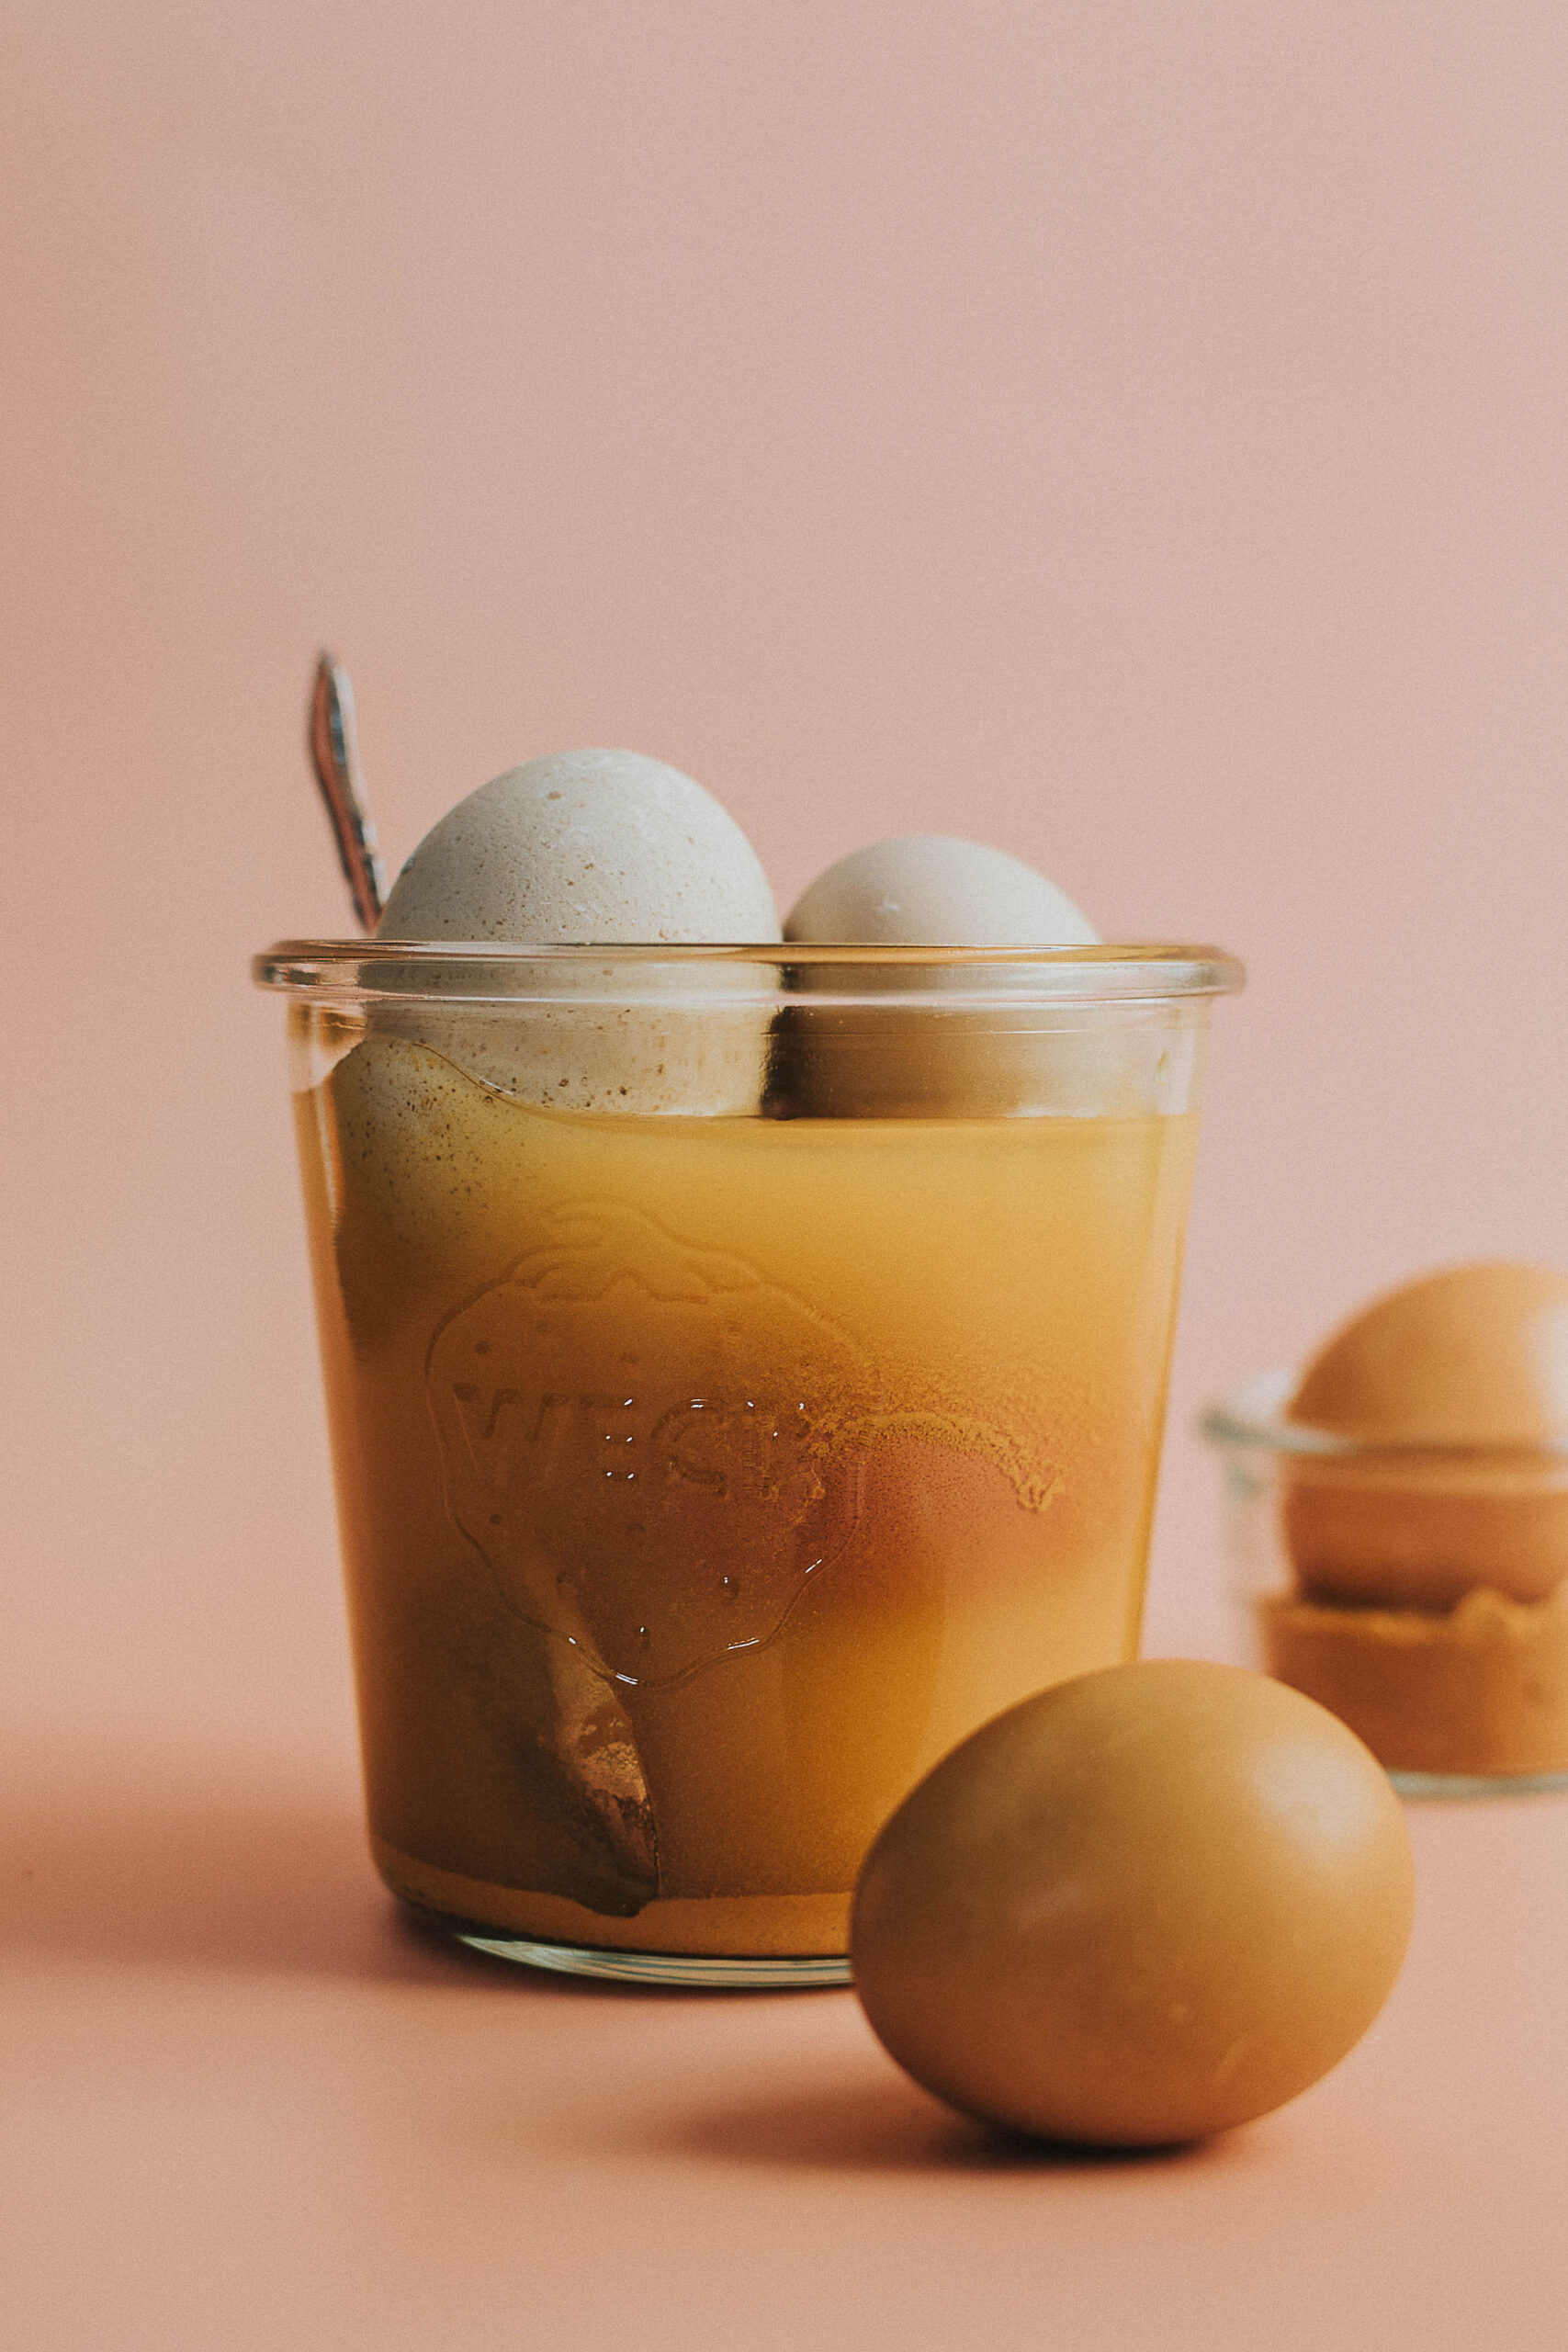
Dye your eggs: Once the eggs and dyes are cool, you’re ready! I like to use glass pint jars as I can fit two eggs in each and then cover them completely with the dye. Allow the eggs to sit in the dyes until you reach your desired colour. To switch up the shades I may only leave some eggs in for an hour, and others overnight. If I want to make oranges, I’ll use the tumeric dye for a short period and switch it to the beet dye. For purple, I start with the beet dye and switch to the cabbage.
Dry your eggs: Allow your eggs to dry completely, and then use a paper towel or rag to rub a bit of olive oil onto the shell to shine them up.

What You Need to Make a Pussy Willow Nest/Wreath
- 6-inch interior diameter willow or vine wreath base (you can use baler wire or metal ring)
- Wild or tame pussy willows (at least 30 stems, depending on branching)
- 24 or 26 gauge floral wire (available at craft stores)
- Alternatively, for an entirely compostable wreath, use hemp twine instead of floral wire
How to Make a Pussy Willow Nest
Trim your pussy willow branches: Use a pair of clean shears to trim off 4 inch sections of catkins from the main branch. You’ll be surprised as to how many branches you need, so pick extra. Pussy willows dry amazingly well, so any extra branches you have will make a superb dried vase display.
Make (or buy) your base: Use the leftover longer branches you’ve already trimmed to make your base. Pussy willow is quite flexible, especially in the spring, but if you’re finding it snapping a lot while you bend it, soak it in the bathtub for a couple of hours to make it more flexible. Start with two branches and bend them to make a circle approximately 6-inches wide in diameter. Hold the branches in the shape of the circle, and start weaving one of the branches in between the two already forming the circle. Do the same with the second branch. Add in 3 to 4 more branches to create a nice, sturdy base.
It doesn’t have to look super pretty, as it’ll be covered with pussy willows! I often premake bases in the fall with Virginia Creeper Vine or Hops Vine. You can also make bases with baler wire, or buy rings from a craft supply store.
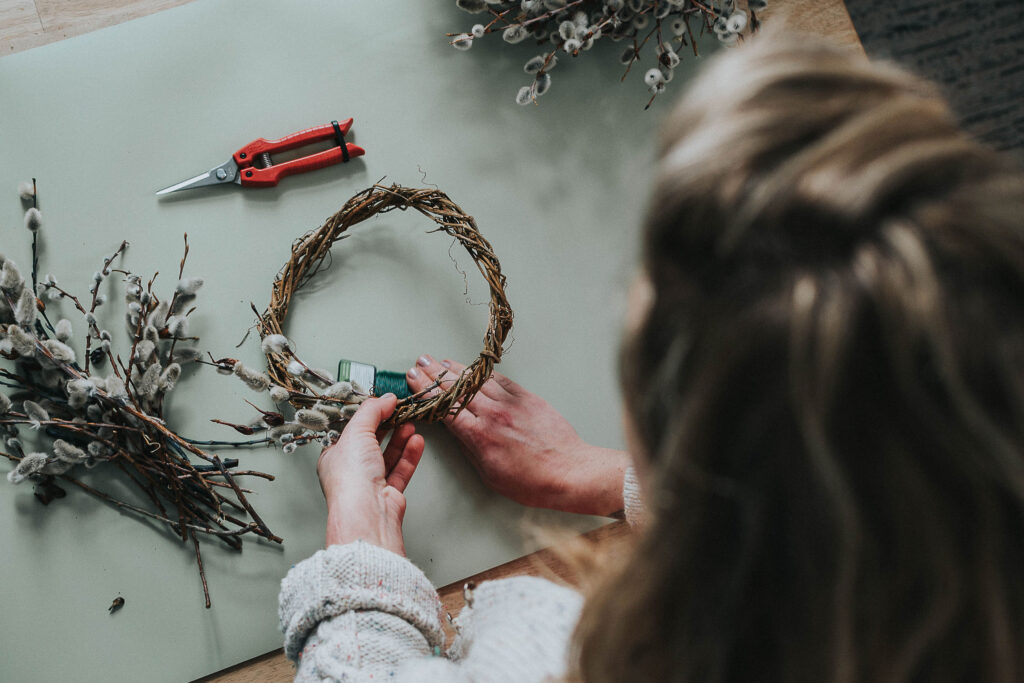
Build your nest: To make an entirely compostable wreath, we’re going to use hemp twine, but you can also use 24-26 gauge floral wire. Take 3-4 of your 4 inch pussy willow stems, and knot their bases with the end of a roll of twine, leaving a tail. Don’t cut your twine. Place the bundle on the wreath base at a 90 degree angle, and wrap the twine going from your stomach into the centre of the wreath 2-3 times, tightening as you go. Add on three more stems about 1⁄2-1 inch below the base of the last and at an angle slightly pointing inside of the wreath, and wrap again. Do this again, but with the three new stems placed at an angle slightly pointing outside of the wreath. Continue in this pattern until you’ve reached your initial bundle.
Finish your nest: This is the most challenging part! Lift your initial bundle and tuck your last stems tightly underneath it, wrapping with your twine as you go. If you use a willow base, you can always tuck the stems into the twisted branches, although they may eventually fall out if they are not wrapped in. Once you are satisfied that your wreath is full and even, cut your twine, and find the tail you left on the initial bundle and knot it tightly. Trim the ends of the twine.
Add the eggs: You can leave your nest as is, and place it on the table and fill it with eggs. In some cases, I’ve wired a small circle of chicken wire to the back of the base, and then hot glued felt on the bottom to prevent it from scratching the table. This is a helpful step if you plan on moving your nest around, but is definitely not necessary!
Other Natural Dyes to Try
The best way to find out what household ingredients will work for dying eggs is to experiment. In the past, I’ve used paprika for yellowy-orange tones, lavender for green, coffee grounds for deep brown, and blueberries for a lighter shade of blue!
Onion Skin Eggs
Growing up, my mom would always, always, always make onion skin eggs while all of us kids made messes with store bought fluorescents, wax crayons and stickers. Onion skins create an almost marbled look, and once they’re wiped with olive oil, could be confused for a glass egg. Simply wrap your unboiled egg in yellow onion skins (red onion skin doesn’t work as well), wrap it once more in cheesecloth, and secure it all with rubber bands. Then boil the eggs for 12 minutes, and voila! Beautifully marbled eggs to add to your other naturally dyed beauties.
Pressed Flower Eggs
Make your eggs extra pretty with a pressed flower or leaf cutting! Once your eggs are boiled and cooler, press the flower or leaf on, wrap the egg in a nylon and secure it with a rubber band. Now it’s ready to dye! When you peel the cutting off you’ll have a beautiful flower shape in the colour of the egg you were dying.
Tips on Responsible Foraging
I am lucky to have access to beautiful tame pussy willow trees on my parent’s farm, as well as another friend’s homestead. I harvest from those trees every spring (the ideal time to prune is when the catkins, the pussy willows, are in bloom), which actually encourages the trees to grow and put out more branches if harvested correctly. Use clean pruners or shears, and cut the branches as close to the main branch as possible. This will encourage five new branches to grow from that spot.
If you are harvesting wild pussy willows, be sure you have permission from the land owner or you are on crown land (in Canada). Quite often, there are a lot of wild pussy willow trees in ditches, especially in low spots, and you can cut from those as long as you are doing so safely and properly. Never over forage, and always leave plenty for pollinators, as catkins are one of the first sources of pollen of the year.
Article from: Spring 2022 Issue #6
Photography Credit: Melanie Villeneuve
More Spring Articles:
- Spring’s Promise: First Signs of Spring
- Garden Planning 101
- 5 Foraging Basics for Beginners
- Buzzing Into Spring
Spring Centrepiece With Naturally Dyed Eggs & Pussy Willow Nest
Learn how to make this spring centrepiece complete with foraged pussy willows and naturally dyed eggs, perfect for Easter.
Materials
Naturally Dyed Eggs
- Eggs (brown, white, green, blue – any colour works and will create a different shade!)
- Mordant (I use vinegar, but you can use Alum if you have it on hand)
- Red Cabbage (for blue and purple toned eggs)
- Red Beets (for red and pink toned eggs) Turmeric (for yellows, and to mix with the other colours for green and orange)
Pussy Willow Nest/Wreath
- 6-inch interior diameter willow or vine wreath base (you can use baler wire or metal ring)
- Wild or tame pussy willows (at least 30 stems, depending on branching)
- 24 or 26 gauge floral wire (available at craft stores)
- Alternatively, for an entirely compostable wreath, use hemp twine instead of floral wire
Tools
- Sauce pan
- Wire cutters
- Spoon
Instructions
Naturally Dye Eggs:
- Boil your eggs: I like to place the eggs in the water before it begins to boil as there’s less risk of cracking them. Bring the water to a boil, and then allow to simmer for 12 minutes. Let eggs cool.
- Make your dyes: For blue dyes, use red cabbage. Shred 1⁄4-1⁄2 of a cabbage (at least 2 cups), place in a pot and cover completely with water. Bring to a boil and let simmer for 15 minutes. Strain mixture into a glass pint jar and add in one tablespoon of vinegar. Allow to cool.
- For red dyes, use the same process but use 2 cups of shredded red beets. For yellow dyes, use 2 tablespoons of turmeric and mix with warm water and one tablespoon of vinegar.
- There’s no need to boil the water for the turmeric dye. I’ve experimented with other types of natural dyes before, but I’ve found I can get the same effect and colours by switching the eggs between the dyes and monitoring timing.
- Dye your eggs: Once the eggs and dyes are cool, you’re ready! I like to use glass pint jars as I can fit two eggs in each and then cover them completely with the dye. Allow the eggs to sit in the dyes until you reach your desired colour. To switch up the shades I may only leave some eggs in for an hour, and others overnight. If I want to make oranges, I’ll use the tumeric dye for a short period and switch it to the beet dye. For purple, I start with the beet dye and switch to the cabbage.
- Dry your eggs: Allow your eggs to dry completely, and then use a paper towel or rag to rub a bit of olive oil onto the shell to shine them up.
Naturally Dye Eggs:
- Trim your pussy willow branches: Use a pair of clean shears to trim off 4 inch sections of catkins from the main branch. You’ll be surprised as to how many branches you need, so pick extra. Pussy willows dry amazingly well, so any extra branches you have will make a superb dried vase display.
- Make (or buy) your base: Use the leftover longer branches you’ve already trimmed to make your base. Pussy willow is quite flexible, especially in the spring, but if you’re finding it snapping a lot while you bend it, soak it in the bathtub for a couple of hours to make it more flexible. Start with two branches and bend them to make a circle approximately 6-inches wide in diameter. Hold the branches in the shape of the circle, and start weaving one of the branches in between the two already forming the circle. Do the same with the second branch. Add in 3 to 4 more branches to create a nice, sturdy base.
- It doesn’t have to look super pretty, as it’ll be covered with pussy willows! I often premake bases in the fall with Virginia Creeper Vine or Hops Vine. You can also make bases with baler wire, or buy rings from a craft supply store.
- Build your nest: To make an entirely compostable wreath, we’re going to use hemp twine, but you can also use 24-26 gauge floral wire. Take 3-4 of your 4 inch pussy willow stems, and knot their bases with the end of a roll of twine, leaving a tail. Don’t cut your twine. Place the bundle on the wreath base at a 90 degree angle, and wrap the twine going from your stomach into the centre of the wreath 2-3 times, tightening as you go. Add on three more stems about 1⁄2-1 inch below the base of the last and at an angle slightly pointing inside of the wreath, and wrap again. Do this again, but with the three new stems placed at an angle slightly pointing outside of the wreath. Continue in this pattern until you’ve reached your initial bundle.
- Finish your nest: This is the most challenging part! Lift your initial bundle and tuck your last stems tightlyunderneath it, wrapping with your twine as you go. If you use a willow base, you can always tuck the stems into the twisted branches, although they may eventually fall out if they are not wrapped in. Once you are satisfied that your wreath is full and even, cut your twine, and find the tail you left on the initial bundle and knot it tightly. Trim the ends of the twine.
- Add the eggs: You can leave your nest as is, and place it on the table and fill it with eggs. In some cases, I’ve wired a small circle of chicken wire to the back of the base, and then hot glued felt on the bottom to prevent it from scratching the table. This is a helpful step if you plan on moving your nest around, but is definitely not necessary!
February 28, 2024
Keep Reading
next post
previous post


© 2025 Trailblazher Co. All Rights Reserved.
Legal